How to Switch Accounts on Kindle? [Complete Guide!]
Disclosure: This post may contain affiliate links. – meaning I may get a commission if you decide to purchase through my links, at no additional cost to you.
It is not too often that we need to change the account on a Kindle device. But, there are occasions when you want to switch accounts on a Kindle. For instance, if you are gifting a Kindle device to another person or changing ownership of a Kindle device, or you simply want to access books from a different Kindle account!
The question is whether you can switch Kindle accounts on your device, and if so, how to do it!
You can switch accounts on a Kindle device. First, you will need to de-register your Kindle device from the existing account. Then, register the Kindle with the other account you wish to access on the Kindle device.
But, that hardly seems easy to do! So, in this article, I’ll share with you the step-by-step process involved in switching an account on Kindle. Plus, I’ll also share with you an easier way you could access books on another account using the same Kindle device!
So, let’s get started!
Did You Know? You can read Unlimited Kindle books on Amazon with Kindle Unlimited! Check out this special offer to try Kindle Unlimited for FREE. Also, read my other article to learn more about Kindle Unlimited!
1. Can You Switch Between Accounts on Kindle?
As I mentioned before, you can switch between accounts on a Kindle device. Well, you may have already known the answer by now. But, I also wanted to share with you a few additional things that you may not be aware of! Let me dive right in –
Can You Have Two Accounts on a Kindle?
You can have two accounts on a Kindle device if you have the Kindle household family library set up. You can easily switch between profiles of 2 adults, 4 teens, or 4 children on the same device. However, the family library is mainly used for sharing books between members of the same family.
This is by far the easiest way to access multiple accounts or user profiles on the same Kindle device. But, it may not be suitable for every need and every person.
There are a couple of different ways to access two different accounts on a Kindle device. It is important to understand the distinction between the two. So, let’s discuss both methods one by one below.
Switching the Default Kindle Account
One method is to switch the default Kindle account used for the device. This method is mostly suited when you want to access the other account for a long duration and you don’t intend to switch back immediately.
This method requires you to deregister a Kindle device and then register it to another account (we’ll get to the exact process in a moment). This method is best suited when you want to change the ownership of your Kindle device.
Unrelated Pro-Tip: You Can Potentially Save Money on Kindle Books just by Changing Your Kindle Store Country!
Or, perhaps you have purchased a new Kindle device and you now want to switch the default Kindle account to the one associated with your loved one. You can use this method in such a situation.
Switching Profiles Using the Household Family Library
Another method to access the secondary account on the same Kindle device is to make use of the “Household Family Library” option on Kindle.
You will first need to create an Amazon Household account (it is completely free!). Then, add an adult to the household. You can also add other family members (optional).
This method is primarily used for sharing books among the members of the family. But, Amazon also allows you to easily switch between profiles of one user to another without deregistering your device from the primary account holder.
Check out my other article to learn more about setting up the Kindle family library.
2. How to Switch Accounts on Kindle? (Step-by-Step Process)
Now that we have understood the two different ways in which you can access different accounts on your Kindle device, let us first understand how to switch the default account on Kindle.
To switch accounts on the Kindle device, first, log in to your Amazon account using a browser. Go to the “Content & Devices” option. Click on the “Devices” tab. Click on the “Deregister” option next to the Kindle device. Now, re-register your Kindle device to the new account using the “Settings” menu on the device.
Let’s have a look at the full process step by step. [Note – make sure to back up your device before switching the default account on the Kindle device!]
Step 1 – Open the “Content & Devices” setting
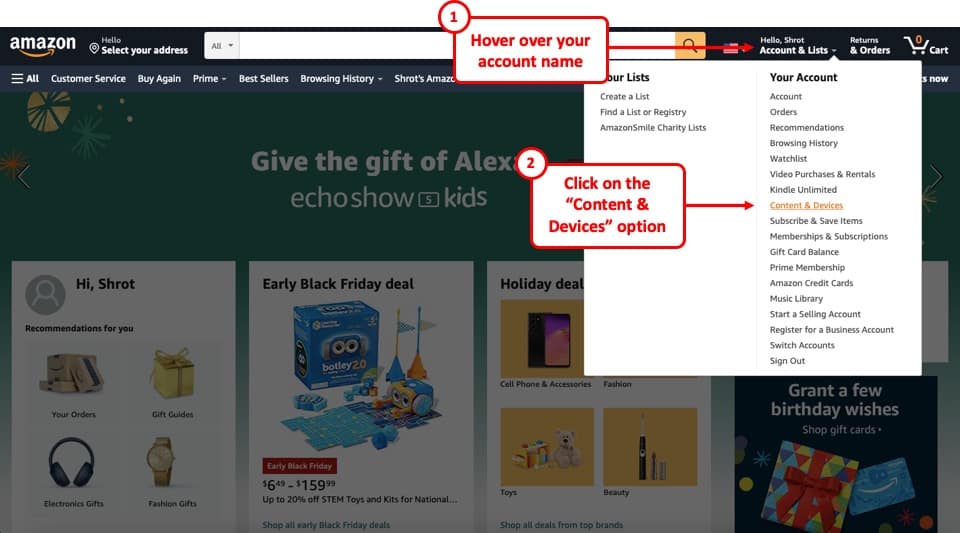
The first thing that you need to do is log into your account.
Then, hover over your account name. A dropdown menu will appear with more options. Click on the “Content & Devices” option.
Step 2 – Click on the “Devices” tab
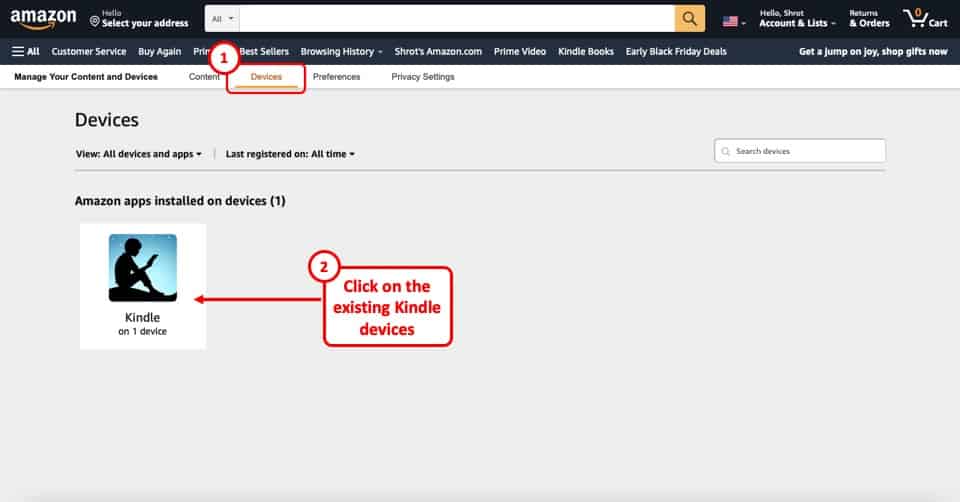
On the next screen, you will see all the eBooks that you have purchased through Amazon. Make sure to click on the “Devices” tab from the top.
Then, you will see all the devices options listed on the page. Locate the Kindle associated with your account, and click on it.
Step 3 – Select the Device to Deregister
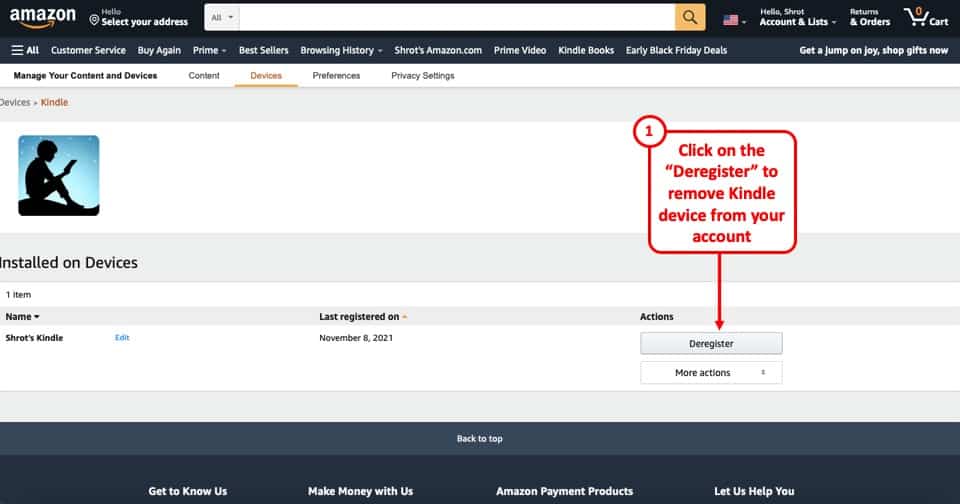
On the next screen, simply identify the Kindle device and click on “Deregister“. This will open up a new pop-up window.
Step 4 – Deregister Your Kindle Device
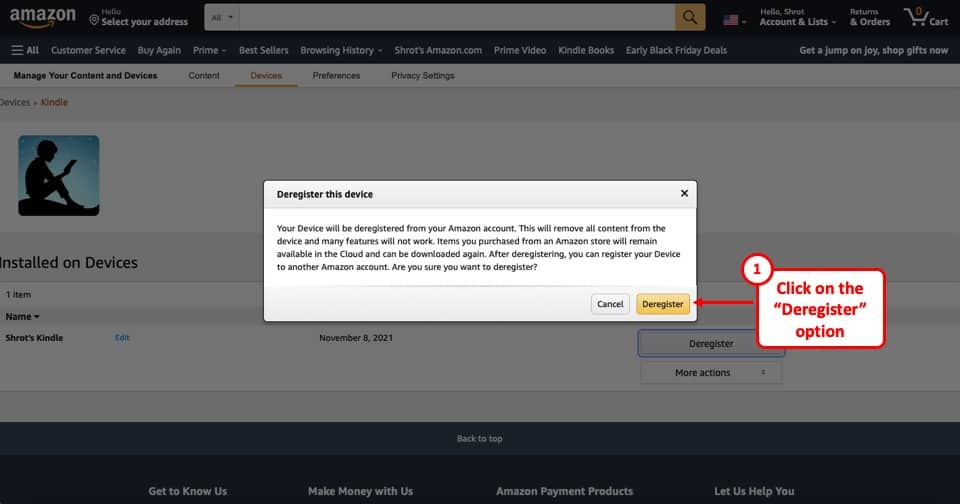
On this pop-up that appears, simply read through the prompt and click on “Deregister“.
The pop-up basically states that the books may be removed from the device if it is deregistered from your account. But, you don’t need to worry as you will still be able to access all the ebooks that you purchased from Amazon as they will remain in the cloud.
Once you click on “Deregister”, your Kindle device will be deregistered from your account.
Step 5 – Re-register Your Kindle Device
Now, to switch accounts on your Kindle device you will need to register the Kindle device to another Amazon account!
To re-register your Kindle device, you need to click on the “settings” option. Then, select the “Register” option (or “Your Account”), and enter the username and password of your Amazon account that you would like to associate the Kindle device with.
That’s it! This will switch the default account on your Kindle device.
Sometimes, you may face issues while registering the device to another account. I’ve written a detailed article on what to do in case you are unable to register your Kindle. Keep the article open in another tab just in case you end up facing the issue. Finding it later might be difficult!
If you don’t have access to a web browser, you can also deregister your Kindle device from your associated default Amazon account using the Kindle itself.
Remember: If you face any issues, make sure to contact the Amazon customer service team!
To do that, simply click on the “Settings” option on your Kindle. Then, click on the “Your Account” option. Look for the option to “Deregister” and click on it. A pop-up will appear to confirm whether you want to deregister. Click on “Deregister”. This will deregister your device from the associated account.
3. What Happens to the Books When You Deregister a Kindle?
The Kindle device works differently from the other ways you access your Kindle books such as the Kindle app on the phone or using a PC to read your books.
When you deregister a Kindle device, the books that were downloaded to the device usually continue to remain available with limited functionality. The books remain on the device even when you re-register the Kindle device or register it to another account.
Part of the reason why Kindle devices last days, even weeks on a single battery charge is that they don’t need to connect to the internet time and again. Thus, the books that you have purchased using the Amazon account usually get downloaded to the device in order to provide a seamless experience to the reader.
This makes the books available on the device even when you are not connected to the internet!
So, even when you deregister your device from the account, the eBooks that are present on the device are still accessible. This includes any eBooks that you may have sent to your Kindle device using your Kindle email address.
Thus, when you plan to change the ownership of your Kindle device, it is recommended to reset the Kindle to the factory settings once the device has been deregistered. You will still have access to the books that you purchased using the Kindle cloud reader. You may want to back up the books that were purchased or received outside of the Amazon ecosystem.
Obviously, if you don’t care about the books that go with the device or if you want your loved one to be able to access the books that you owned on the device, you don’t need to reset your Kindle device.
Switching accounts on other platforms such as Kindle mobile app or Kindle for PC doesn’t leave any noticeable traces of the books once you remove your account from those devices.
4. How to Switch Profiles on Your Kindle Device?
Although a Kindle is designed to be linked to just one amazon account at a time, you can use two Amazon accounts on one Kindle by setting up the Amazon Household and enabling the sharing of the family library.
Once you’ve done that, you can easily switch account profiles on the Kindle device.
Now let’s take a look at how to switch profiles between accounts created within the household family library on Kindle.
Here’s what you need to do –
- Set up and create a “Household Family Library” first (click on the link to check out my other article with detailed steps)
- Add a “Kindle Child Profile” to your household family library (optional step to understand the process better)
- Open the “Settings” menu on your Kindle device
- Click on the “Household and Family Library” option. Here, you will see all the different profiles that you have created.
- Simply select the profile that you want to switch on your Kindle device, and click on “Start Now”.
This will switch the profile of your Kindle device and show the books that are available to a particular family member’s profile.
5. How to Switch Your Kindle Account on a Computer?
Switching your Kindle account when reading on a computer is actually quite easy regardless of whether you are using a PC or a Mac! However, the process may vary slightly depending on how you are accessing your Kindle account.
Switching an Account Using a Kindle Cloud Reader
You can easily change your account when using a Kindle cloud reader in two simple steps. Let’s take a look at how to do it –
Step 1 – Sign Out From Your Kindle Account
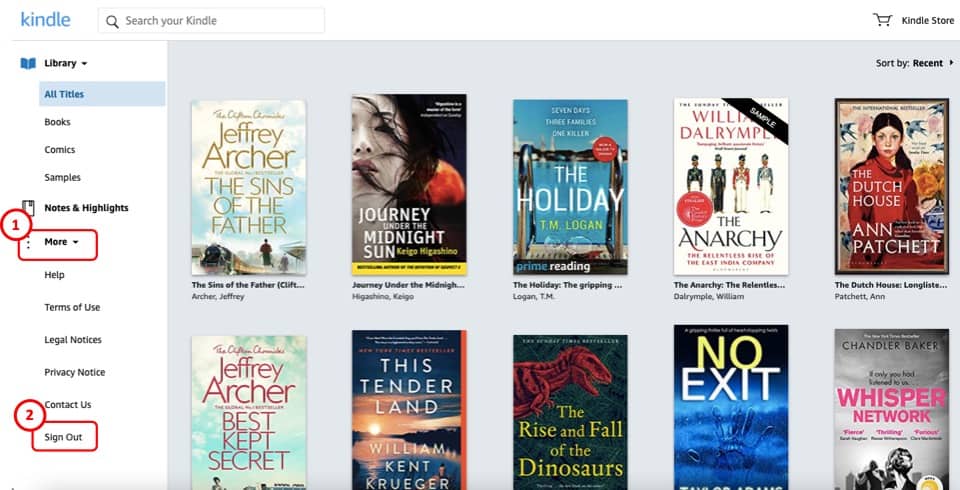
You may not see the option to log out of your account at first. Simply click on the “More” button. A few additional options will appear. Then, click on the “Sign Out” option to log out of your existing account.
Step 2 – Sign in to the Other Amazon Account
Once you click on the “sign out” button, the site will automatically lead you to the Amazon sign-in page.
To switch the account, simply type in the credentials of the account that you want to access, and click continue.
Switching Your Kindle Account using the “Kindle for PC” application
If you are using the Kindle application on your PC instead of the cloud reader, you will have to deregister the device first just the way we did it for a Kindle device earlier in the article.
Here are the steps that you need to follow –
Step 1 – Open the “Manage Your Content & Devices” settings
The first step is to open the “Manage Your Content & Devices” settings. You can either follow the steps that I shared earlier in the article or simply click on the link.
Step 2 – Click on the “Kindle” option
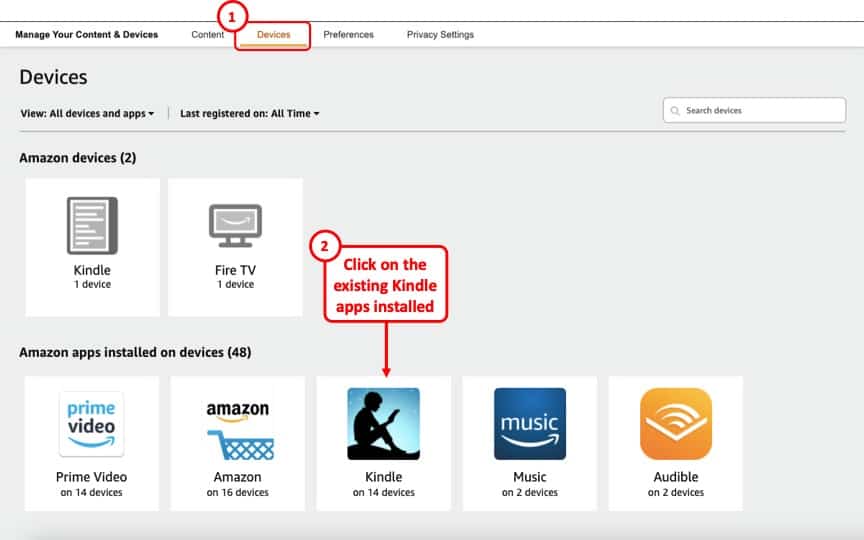
First, make sure that you click on the “Devices” tab on the top. Then, scroll down to the section named “Amazon Apps Installed“. Then, click on the “Kindle” option.
Step 3 – Deregister Your Kindle for PC Application
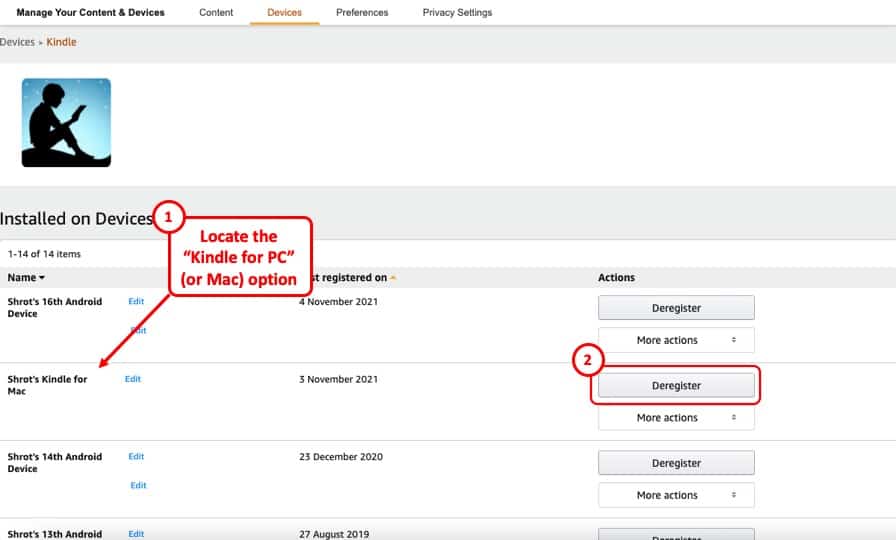
Locate the option that says “Kindle for PC” (or Kindle for Mac in my case), and click on the “Deregister” option. You will be prompted with a pop-up for a confirmation. Simply click on the “Deregister” option again.
Step 4 – Log in to the Kindle for PC application on your Computer
Once your device is deregistered, the software will now show the login page. You simply need to log in to your Kindle for PC application on your computer and you will have successfully switched the accounts!
If you are unable to see the login page, click on the “Tools” menu and click on “Options”. Then, on the left-hand panel, click on “Registration”. This will open the registration page. You can now log in using your other Amazon account credentials.
How to Switch Accounts on Kindle App on Mac?
If you are using the Kindle App on Mac, switching accounts looks really difficult at first.
To switch accounts when using Kindle app on Mac, first, open the app. Then, click on the “Kindle” in the menu bar. Click on “Preferences”. On the “General” tab, under registration settings, click on “Deregister”. Now, repeat the steps but click on “Register” to switch your Kindle account.
If you don’t do the above, even if you uninstall and re-install the app, and you won’t be able to switch accounts. It feels really annoying without knowing the solution.
Here’s a detailed explanation of the steps with visuals –
Step 1 – Open the Kindle “Preferences” Settings
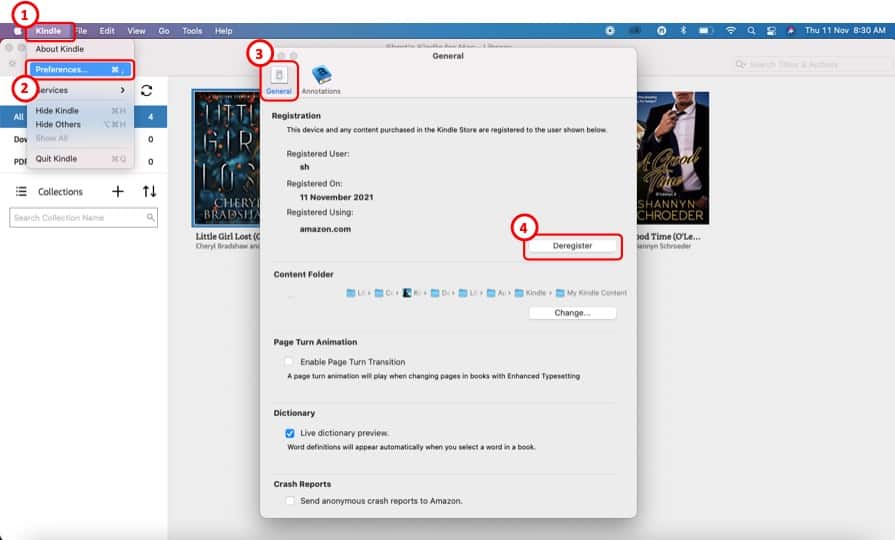
The first step is to click on the “Kindle” menu on the top-left part of your screen. From the dropdown, click on “Preferences“. This will open up another window.
Step 2 – Deregister Your Kindle for Mac Application
Now, in order to sign out of the Kindle app on Mac, make sure you are on the “General” tab on the top. Then, under registration settings, click on “Deregister“.
A pop-up window will appear asking you to confirm that you want to deregister. Click on the “Deregister” option on this window as well.
Step 3 – Register Your Kindle for Mac to Another Kindle Account
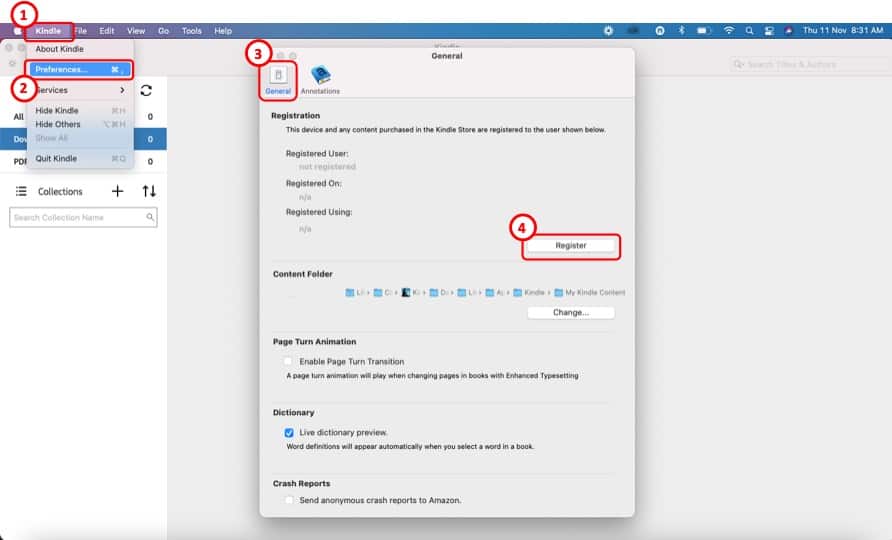
Now, repeat the steps and go open the “Preferences” settings for the Kindle app on Mac. On the “General” tab, under the “Registration” settings, this time you will be asked to “Register“.
Click on this option. A new window will appear on the next screen where you will be prompted to log in to your Amazon account.
Enter the login credentials of the Amazon account associated with the other Kindle account that you want to access.
6. How to Switch Kindle Accounts on a Mobile Device?
You can also easily switch between your Kindle accounts when using a mobile device such as Android, iPhone, or an iPad!
Even though the device may vary, the overall process remains more or less the same. I’m going to show you the steps to switch between your Kindle accounts on Android as an example.
Step 1 – Click on the “More” option
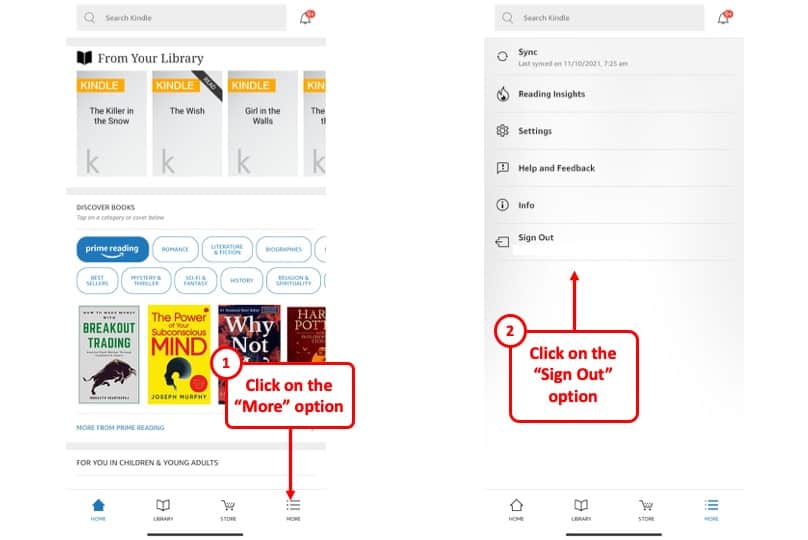
When you open the Kindle app on android, click on the “More” option on the bottom right corner of the screen. This will be represented by a “3 horizontal lines” icon. Click on it.
Step 2 – Click on the “Sign Out” option
On the next screen, simply click on the “Sign Out” option. You will be signed out of your Kindle account of the device.
Step 3 – Sign in to the desired account
In the final step of the process, simply enter the login credentials of the account that you need to sign in to, and press “Continue“.
This way, you can easily switch between your multiple Kindle accounts on iPhone, Android, and iPad!
7. How to Switch Accounts on the Kindle Fire Tab?
Switching account profiles on a Kindle Fire Tablet works a bit differently from the other devices.
To switch account profiles on a Kindle fire tab, open the notification panel and click on “Exit Profile”. Enter the parental control password to log in to the adult profile. To switch to the child profile, pull down the notification section, click on the profile option and select the child profile.
Here’s a video that will explain the process more visually –
In case you are a person who prefers reading, here’s a detailed explanation of how to switch account profiles on a Kindle fire tab.
Switching from Child Profile to Parent Profile on Kindle Fire
Switching from the child profile back to the adult profile is quite easy. Here’s what you need to do –
- Open the notification drawer by dragging it downwards from the top part of the screen.
- Locate the “Exit Profile” option. Expand the notification drawer if necessary.
- On the lock screen, click on the “Profile Icon” on the top right part of the screen
- Click on the “Parent” profile
- Enter the password for parental controls.
- If you’ve added an additional device password, enter that on the next screen.
- Home screen of your profile will appear.
Switching from Parent Profile to Child Profile on Kindle Fire
The process of changing the parent profile to the child profile is a lot easier (for obvious reasons). Here’s how to switch from the parent profile to the child profile –
- Open the notification drawer by dragging it downwards from the top part of the screen.
- At the bottom part of the notification drawer, click on the “Profile” icon.
- Click on the child profile to switch.
The device will now switch to the child profile and you will be greeted with the Kindle Kids account.
How Many Kindle Devices Can be Linked to the Same Account?
While we have looked at ways in which you can use the same Kindle device for multiple accounts, ever wonder how many Kindle devices can be hooked up to the same account?
You can link more than 15 Kindle devices to the same account, however, you can view one book on a maximum of 6 devices at any given point in time. Amazon does not allow you to share the same book with unlimited devices.
There are multiple ways in which you could use this information. If you are running out of space on your Kindle and it is slowing your device down, you could use this as a strategy to distribute your books on multiple devices.
That said, at that point, I would recommend that you purchase a Kindle with more storage space and sync all the books to just one Kindle.
Credit to freestocks.org on Pexels for the featured image of this article

About the Author
Akansha is a former business journalist and a seasoned communications professional. She is the founder of TheBookBuff, an avid storyteller, and a lifelong biblophile! Check out her profile page to know more about Akansha.


![Does Reading Improve Memory? [Here’s What We Found!]](https://thebookbuff.com/wp-content/uploads/2021/10/puzzled-woman-thinking-and-holding-clipboard-while-22C2V42-optimized-300x200.webp)
![Should You Read a Book Prologue? [Here’s What to Do!]](https://thebookbuff.com/wp-content/uploads/2021/10/Book-Prologue-optimized-300x200.webp)
![Does Kindle Work Without Wi-Fi? [Here’s Everything to Know!]](https://thebookbuff.com/wp-content/uploads/2022/06/Free-Wifi-300x200.webp)

