How to Update Your Kindle? A Complete Guide With Images!
Disclosure: This post may contain affiliate links. – meaning I may get a commission if you decide to purchase through my links, at no additional cost to you.
When it comes to modern devices like Kindles and smartphones, it is important to keep the firmware up to date as this not only adds new features to the device but often comes with security upgrades and bug fixes!
But how do you update your Kindle?
Most Kindles update automatically. However, to update your Kindle manually, download the latest firmware from Amazon to your computer, connect your Kindle to your computer, transfer the firmware to your Kindle, eject your Kindle, open the “settings” from the menu, and select “Update your Kindle”.
In this article, I’ll walk you through the complete process step-by-step with pictures to show you how to update your Kindle. Plus, I’ll also help you troubleshoot and manually update your Kindle if the standard process doesn’t work! That, and much more!
So, let’s get started!
Do You Need to Update Your Kindle?
You don’t have to necessarily update your Kindle as long as it can perform the daily tasks that it is supposed to. However, it is always recommended to keep your Kindle updated to the latest firmware provided by Amazon. Sometimes, updating a Kindle may become necessary!
It could happen that you are unable to perform a particular task on your device correctly anymore. Or, perhaps your Kindle behaves in a manner it didn’t before, such as the battery not lasting long enough, or your Kindle suddenly quits the book that you’re reading or restarts the device!
In all these scenarios, it becomes essential to update your Kindle.
Do Kindles Update Automatically?
Another factor to consider in updating the Kindle is that Amazon has designed Kindles to update the firmware automatically.
From time to time, your Kindle will check with the Amazon servers if there is a firmware update available for your device. This will usually happen when you connect your Kindle to the wifi.
So, in most circumstances, you don’t necessarily even need to think about updating your device as it is designed to update automatically.
How to Update Your Kindle?
Sometimes, your Kindle may not automatically update. There are various reasons this could happen but the best way to solve this problem is to use the “Update Kindle” option and make sure your device is up to date!
The process of updating your Kindle is quite simple if you know what you need to do! Let’s take a look at the steps involved –
Step 1 – Connect Your Kindle to the Internet
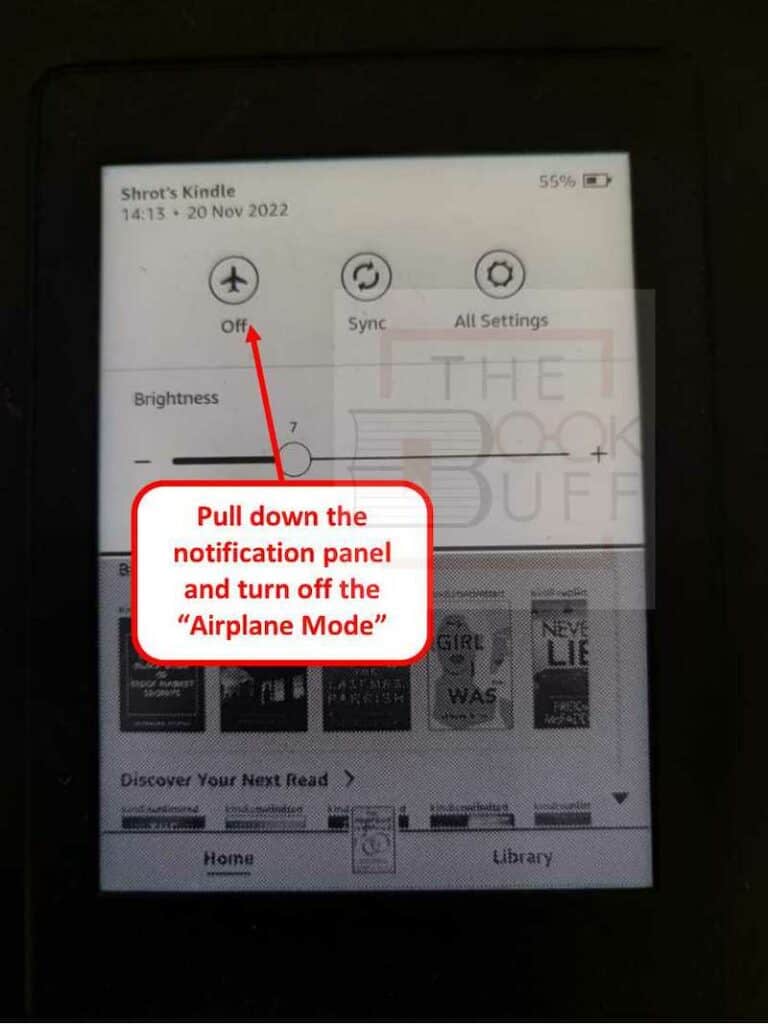
As the first step, make sure your device is connected to the internet. You can open the notification panel from the top of the Kindle screen, and turn off the “Airplane Mode” on your Kindle.
This will turn on your Kindle.
Step 2 – Open the Settings Page on Kindle

Next, click on the “3 vertical dots” on the top right part of your screen, and from the dropdown menu that appears, click on the “Settings” option.
Step 3 – Click on Device Options
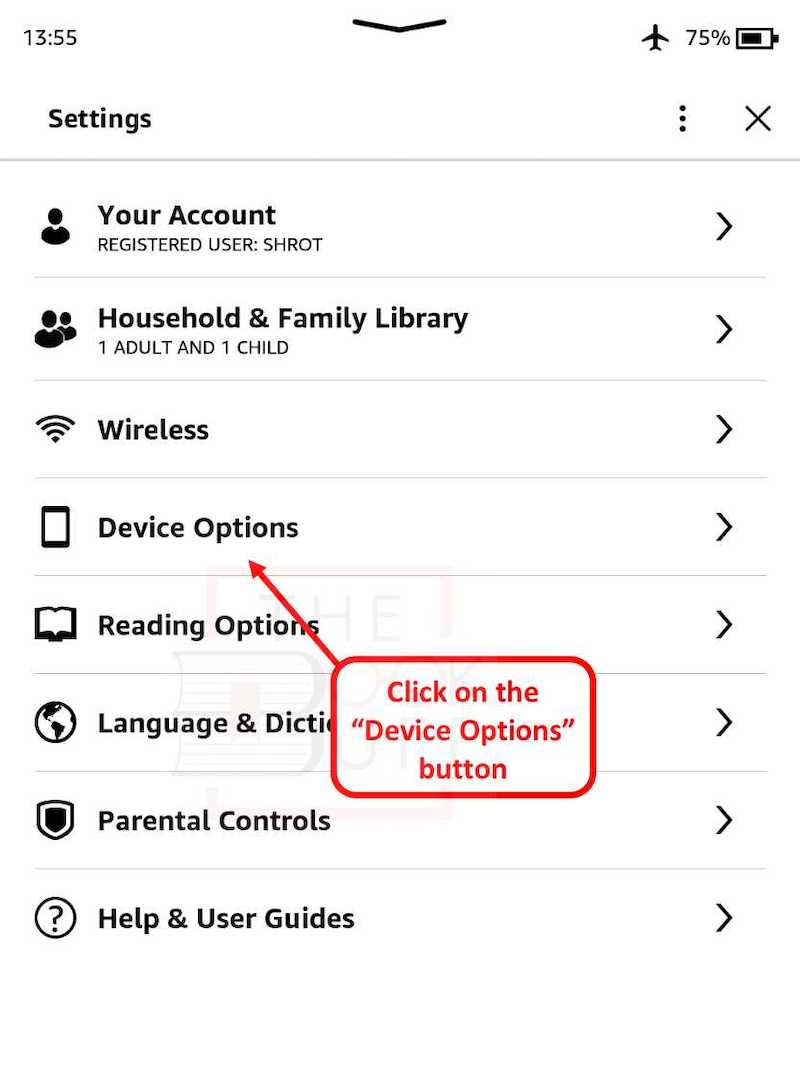
From the screen with the settings options, locate the “Device Options” and click on it as shown in the image above.
Step 4 – Open the Advanced Options

In the next step, locate and click on the “Advanced Options” from the various options available. This should be the last option on screen.
Step 5 – Click on the “Update Your Kindle” Option

On the advanced options screen, click on the “Update Your Kindle” option. You may see a pop up appear asking you to confirm if you wish to update your Kindle. Click on the “Update Kindle” option.
Your Kindle will now automatically connect with the Amazon server and carry out the software update.
Sometimes, this standard process of updating the Kindle may not work as the option to update the Kindle may be grayed out (as you can see in the image above), or perhaps your Kindle is too old to support the standard updating process.
In such situations, you will need to manually install the updated software and update the Kindle. I’ll show you how to do that in the next section.
How to Manually Update Your Kindle?
Other than letting Amazon update the Kindle for you, you can also update your Kindle manually. However, in order to do that, you will first need to download the latest firmware onto your computer for your specific Kindle model.
For this, you will need to know your exact Kindle model. If you already know which Kindle you own, you can skip to the next section. Otherwise, follow the instructions mentioned in the following section below –
How to Know Your Kindle Model?
There are multiple ways to know the Kindle model and generation of your device. I’ve captured all the details in my other article titled “How to Identify Your Kindle?”. In it, I’ve shared ways to know your Kindle model even when you don’t have your ereader in front of you.
Please refer to the article I just referenced above if you need a step-by-step guide with pictures. Meanwhile, I’ll highlight the key steps below –
- Step 1 – On your Kindle, click on the “3 vertical dots”, and click on the “Settings” option.
- Step 2 – On the “Settings” page, click on the “Device Options” button
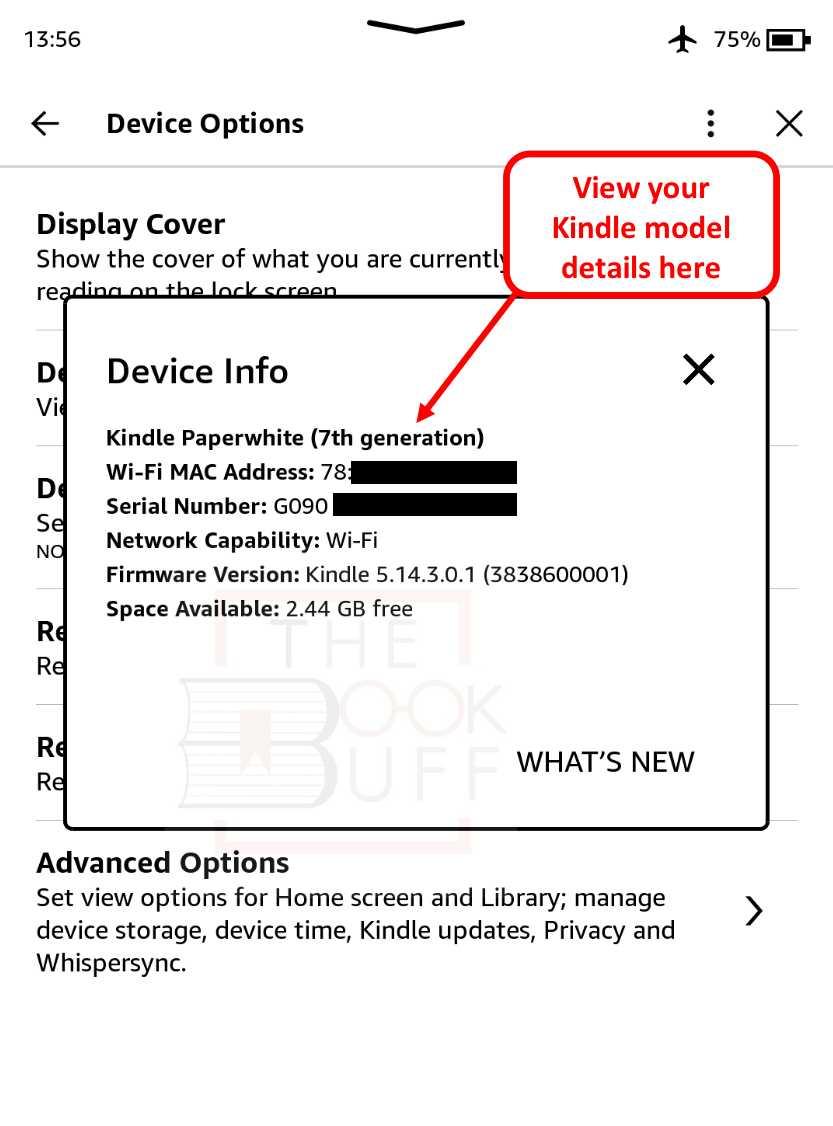
- Step 3 – From the device options page, click on the “Device Info” option
- Step 4 – In the pop up that appears, you can see the Kindle variant, generation and the serial number.
Updating Your Kindle Manually
Once you know the exact Kindle model you own, you will need to download the latest software update for that Kindle model, and push the update on your Kindle manually using your computer.
I have listed the complete process below –
Step 1 – Download the Latest Kindle E-Reader Software Update

The first step is to download the latest version of the software update for your e-reader. To do so, click on this link to open the list of updated firmware versions.
Locate the latest software update for your device as per the Kindle variant and generation that we identified in the previous section and click on the “Download Software Update” option for the respective device.

The file will automatically start downloading. Save the file in an easily accessible folder.
Step 2 – Transfer the Software Update to Your Kindle

As a next step, connect your Kindle to your computer using the USB charging cable. Once connected properly, you should be able to access the Kindle drive on your computer.
You shall know that your Kindle is connected to your computer if you see the screen on your Kindle turn into a connection mode.
Locate the Kindle drive on your computer and double click to open it (just as you would open the “c” or “d” drive on your computer).

Now, drag and drop (or copy and paste) the software update that you downloaded from Amazon into the “Kindle” drive. Make sure to drop the file directly in the drive and not inside any folder on the Kindle drive.
Step 3 – Eject Your Kindle Safely
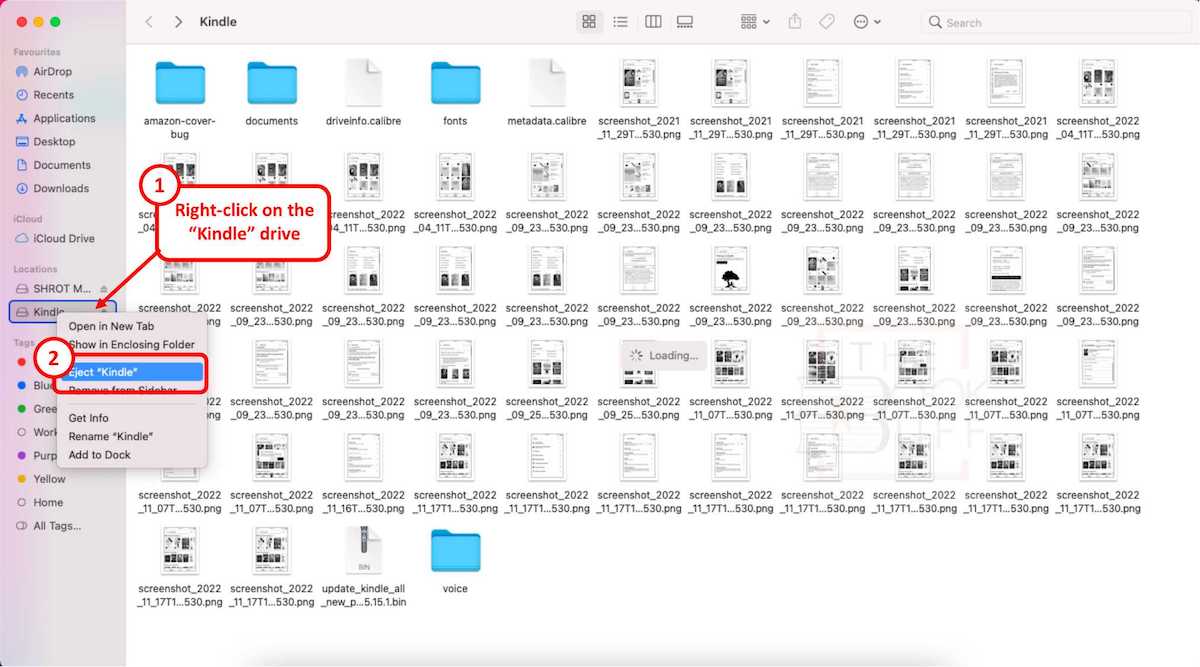
Your computer shall transfer the software update file onto your Kindle in a few moments.
Once the transfer is complete, you need to eject the device from your computer. To do so, right-click on the “Kindle” drive, and click on the “Eject” option.
Once you eject your Kindle, the screen on your device should return to the normal state. Meaning, you should now see the standard “Home” screen on your Kindle instead of the “Connection Mode”.
Step 4 – Update Your Kindle
Now, all you need to do is simply update the software that you’ve downloaded on your Kindle. To do that, follow the steps mentioned below –
- Tap on the “Menu” icon (3 vertical dots on the top right part of the Kindle screen)
- From the dropdown, click on the “Settings” option
- On the settings screen, tap on the “Menu” icon once again.
- Click on the “Update Your Kindle” option
- Next, click “Ok” if prompted for a confirmation to update the Kindle.
You should now see a message displayed on your screen stating that “Your Kindle is Updating”.
In a few moments, your device will be updated to the latest firmware version. If you are still unable to select the “Update Your Kindle” option (as explained in step 4), click on the “restart Kindle” option.
This will reboot your Kindle, and in the process, install the updated software as well. Once your Kindle reboots, just check the firmware version as described in the next section.
How to Know if Your Kindle is Running the Latest Software?
To know if Kindle is running the latest software, click on the “3 vertical dots” on your Kindle, open the settings option, click on the “Device Options” and click on “Device Info”. Note the Kindle model and the firmware version. Then, compare it to the latest firmware version provided by Amazon.
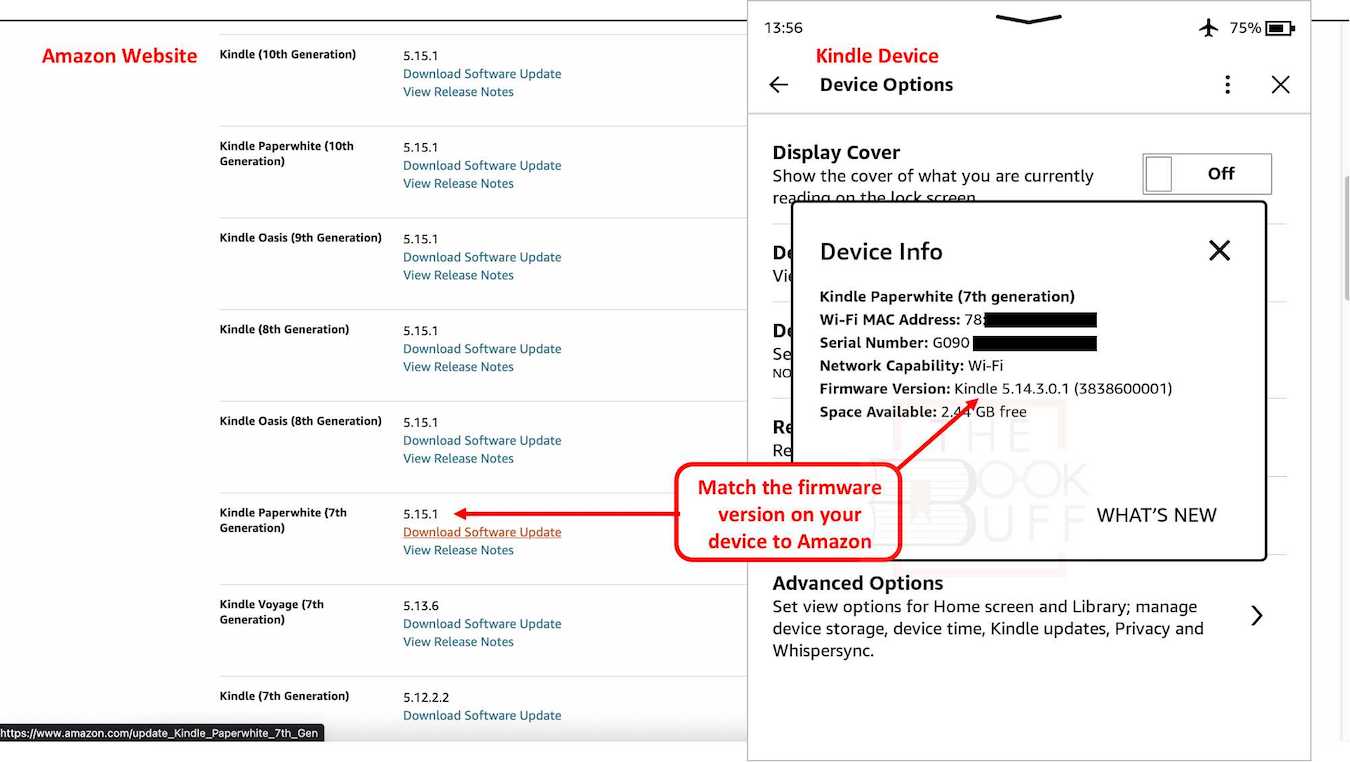
If there is a discrepancy on the firmware version, then you will need to update your Kindle. If your device doesn’t update automatically, then follow the steps mentioned in the previous section to manually update your Kindle.
Update Your Kindle Greyed Out? Here’s Why and What to Do!
Often, when you try to update your Kindle, you notice that the “Update Your Kindle” option is greyed out and you just can’t select this option!
There are multiple reasons this can happen. I mentioned some of them below –
- Your Kindle is not connected to the internet.
- Your Kindle is already running the most updated firmware version
Sometimes, it can even be a combination of both the above factors.
Another thing to note is that sometimes, your Kindle may just not recognize that a new firmware update is available from Amazon even when it is connected to the internet. Thus, you notice that the option is greyed out even though you know that the firmware on the Kindle is not the latest and needs updating.
The only solution to this issue is side loading (manually updating the software) the latest firmware on your Kindle as per the steps described above, and updating your Kindle.

About the Author
Akansha is a former business journalist and a seasoned communications professional. She is the founder of TheBookBuff, an avid storyteller, and a lifelong biblophile! Check out her profile page to know more about Akansha.

![How Much Do Kindle Books Cost? [With Data Proof!]](https://thebookbuff.com/wp-content/uploads/2021/11/james-tarbotton-gm18kqu9TxQ-unsplash-optimized-300x199.webp)
![How to Get Interested in Reading? [The Complete Guide!]](https://thebookbuff.com/wp-content/uploads/2021/08/A-person-reading-a-book-optimized-300x200.jpeg)

![How to Create and Access Kindle Account? [Complete Guide!]](https://thebookbuff.com/wp-content/uploads/2021/11/kwame-anim-PJ3rjIfD__k-unsplash-optimized-300x200.webp)
![Why do People Like to Read? [Benefits & How to Start!]](https://thebookbuff.com/wp-content/uploads/2022/03/pexels-mentatdgt-1319854-300x200.jpg)