How to Change Font on Kindle Paperwhite? [Full Guide!]
Disclosure: This post may contain affiliate links. – meaning I may get a commission if you decide to purchase through my links, at no additional cost to you.
Unlike a physical book, the Kindle eReader provides you with an option to read a book in a few different varieties of fonts. This means, if you don’t like the font used for a particular book, you can change it to your favorite font!
But, how exactly do you change the font on the Kindle?
To change the font style on Kindle, first, open a book. Next, tap anywhere near the top of the screen when the book is open. From the menu that appears on the top, click on the “Aa” button. On the next screen, click on the “Font” tab and choose a font style from the “Font Family” section.
In this article, I’ll show you all the steps involved (with pictures) in changing the font on your Kindle. Plus, we will also learn how to adjust the line spacing and margins on your Kindle. Do note that although the title mentions Kindle Paperwhite, however, the steps apply for all the other Kindle variants as well.
So, let’s get started, shall we?
How to Change Font on Kindle?
Let us first cover the basics and understand how to change the font on your Kindle eReader.
Here are the steps involved in changing the font style on Kindle –
Step 1 – Open the Book
The first step to changing the font of your book on your Kindle is to open the book. Simply visit the library section of your book, browse and locate the book that you wish to read, and tap on the book to open it.
Step 2 – Tap Near the Top of the Page

Once you have the book open, tap anywhere near the top of any page on the book (I’d recommend tapping in the center near the top of the page).
This will open a new menu.
Step 3 – Open the “Font” Settings

Next, from the menu that appears, open the “Fonts” option. This is represented by the “Aa” button on the menu. Tap on this button.
Step 4 – Choose a Different Font

In the final step, first click on the “Fonts” tab. Next, in the first row labeled “Font Family”, click on the “>” button to see all the various font options available in your Kindle.

By default, Kindle provides you with 9 different font styles. You can choose any font that you like by tapping on it. As you select a particular font, you will see the text of the book change to that font immediately.

Once you’re satisfied with your selection, simply tap anywhere on the page of the book to exit the fonts menu and continue reading the book.
How to Change Font Style on the Kindle App for Android?
One of the most helpful things about reading ebooks on a Kindle is that Amazon maintains consistency in the general user interface and the typical settings and options that are available across devices!
This means, the process of changing the font on the Kindle app for android is similar to the process of changing the fonts on your Kindle eReader!
Nevertheless, here are the steps involved in changing the font style on the Kindle app for android:
Step 1 – Open the Book
As we did on the Kindle, the first step is to open the “Library” section on the Kindle app for your smartphone. Scroll through the section and locate the book you wish to read. Then, simply tap on the book to open the book.
Step 2 – Tap Near the Top of the Page

As a next step, simply tap anywhere near the top part of the screen. This will open the menu with additional options.
Step 3 – Open the “Fonts” Option

From the menu that appears on the top, click on the “fonts” settings represented by the “Aa” button. This will open the font option.
Step 4 – Choose the Font

The last step of the process is to simply choose the font as per your preference. When you click on the “Fonts” option, a new menu will appear. First, click on the “Fonts” tab. Then, simply scroll through the various options provided for the font style, and tap on any font that you wish to apply.
Once you are happy with your selection, tap anywhere on the book to exit this menu.
How to Change Line Spacing on Kindle?
Not many people are aware that you can change the spacing between the lines on a Kindle eReader. This obviously makes reading more comfortable and perhaps acts as another reason why you should choose an e-reader over physical books!
Let’s take a look at how this can be achieved:
(Note – I won’t repeat the images that are common and covered in the previous steps. In case something is unclear, please refer to the previous sections)
- Tap anywhere near the top part of your Kindle screen
- From the menu that appears on the top, click on the “Aa” option to open the font settings
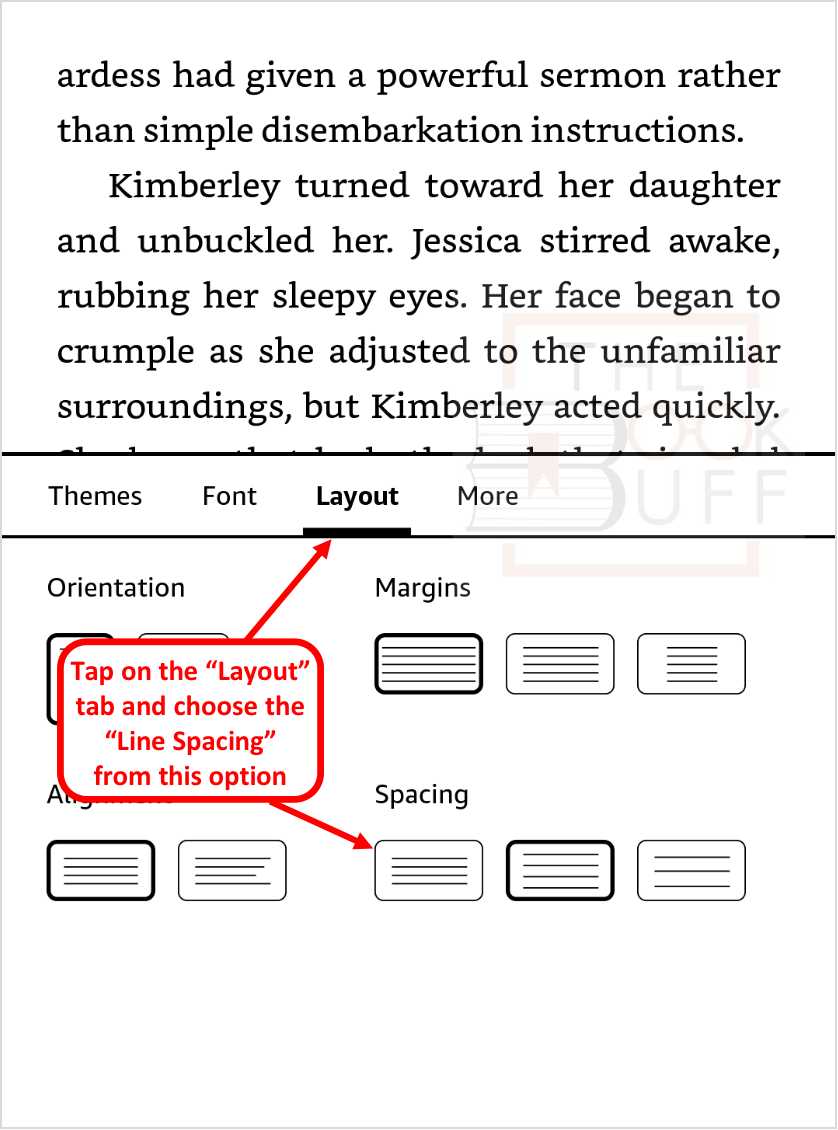
- Next, from the menu that appears at the bottom, click on the “Layout” tab
- On the layout screen, choose any of the 3 options provided under the “Spacing” section
By default, the “moderate” line spacing option is selected for all users.
The steps to change the line spacing of your book are the same for all variants of the Kindle reader (Paperwhite, Oasis, and the basic Kindle), as well as the Kindle app for smartphones.
How to Adjust Margins on Kindle?
If you follow the steps mentioned in the previous section for line spacing, you will notice that you also get to see an option to change the margins on your Kindle reader!
Changing the margins will basically change the spacing between the text and edge of the Kindle screen. So, by increasing the margin, you will decrease the amount of space that the text of the book can occupy on the Kindle screen.

With that understanding, let’s take a look at how to change the margins on Kindle:
- Tap near the top part of your Kindle screen to open the menu
- Choose the “Font” settings by tapping on the “Aa” option visible on the menu
- Click on the “Layout” tab from the menu that appears next
- Finally, under the “Margins” section, choose the margin setting that you wish to apply
Typically, Kindle provides 3 different options for the margin settings. I recommend choosing the first option (lowest margin) for reading on a Kindle. The Kindle screen is usually quite small (unless you are reading on Kindle Scribe), and reducing the space for text makes a poor reading experience in my opinion.
Other Layout Options on Kindle
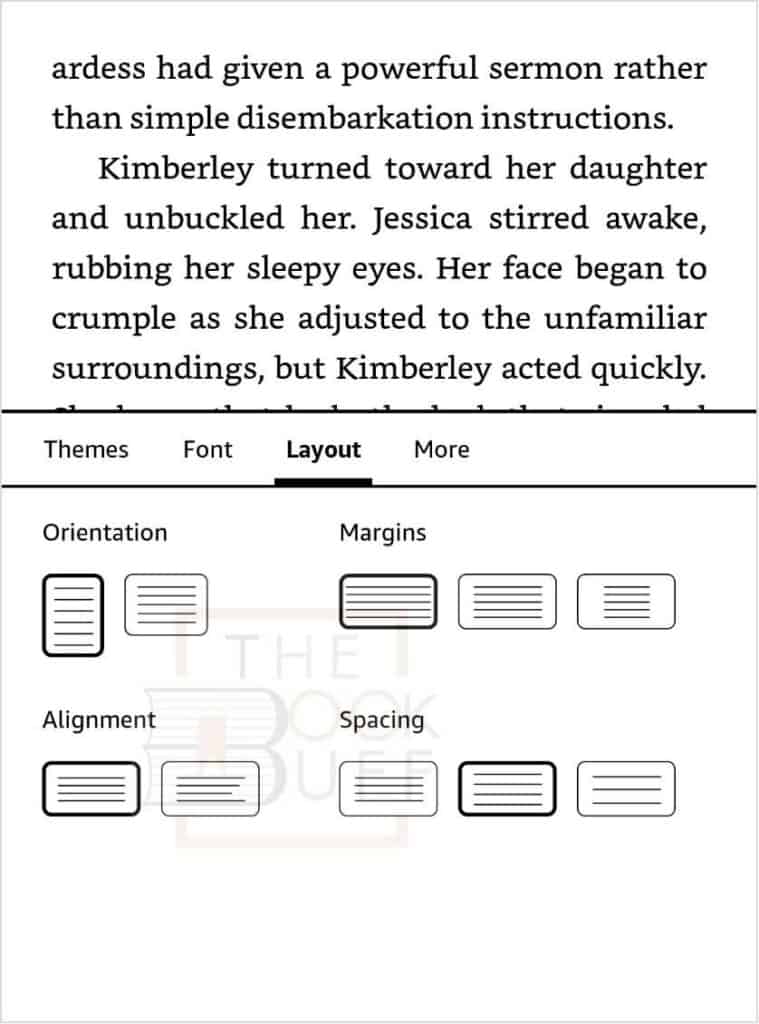
There are a couple of other layout options also available on the Kindle. These include changing the orientation of text on your screen from vertical to horizontal, and switching the alignment of text between justified and left alignment.
Let’s take a look at both these settings:
Changing the Text Orientation on Kindle
Kindle provides two different orientation modes i.e. vertical and horizontal. By default, most Kindle readers have the vertical orientation set. However, you can easily change this if you wish.
The process to open the “Orientation” setting is the same as the method described in the previous sections. Simply open the “font” settings, and open the “layout” tab.
Once on the layout tab, choose the orientation for your Kindle reader from the two options provided.
More expensive Kindle variant i.e. Kindle Oasis has the option to auto-adjust the orientation. You don’t need to manually change the orientation. However, you do have the option to lock the orientation to either vertical or horizontal if you wish to do so.
Changing the Text Alignment on Kindle
You can also change the alignment of text on your Kindle if you wish to do so. However, unlike the traditional document readers, you only get two options i.e. left alignment and justified alignment.
Once again, you can access the alignment setting by opening the “font” option from the menu on the top. Then, click on the “Layout” tab, and choose the options from the “Alignment” section.
I prefer to use the “Justified” alignment (the first option from the left). However, you can choose based on your preference. Once you choose your setting, click anywhere on the page to exit the menu.
The options and the process to change the text alignment and the orientation is the same for both the Kindle reader and the Kindle app for phones.
How to Change the Font Size on Kindle?
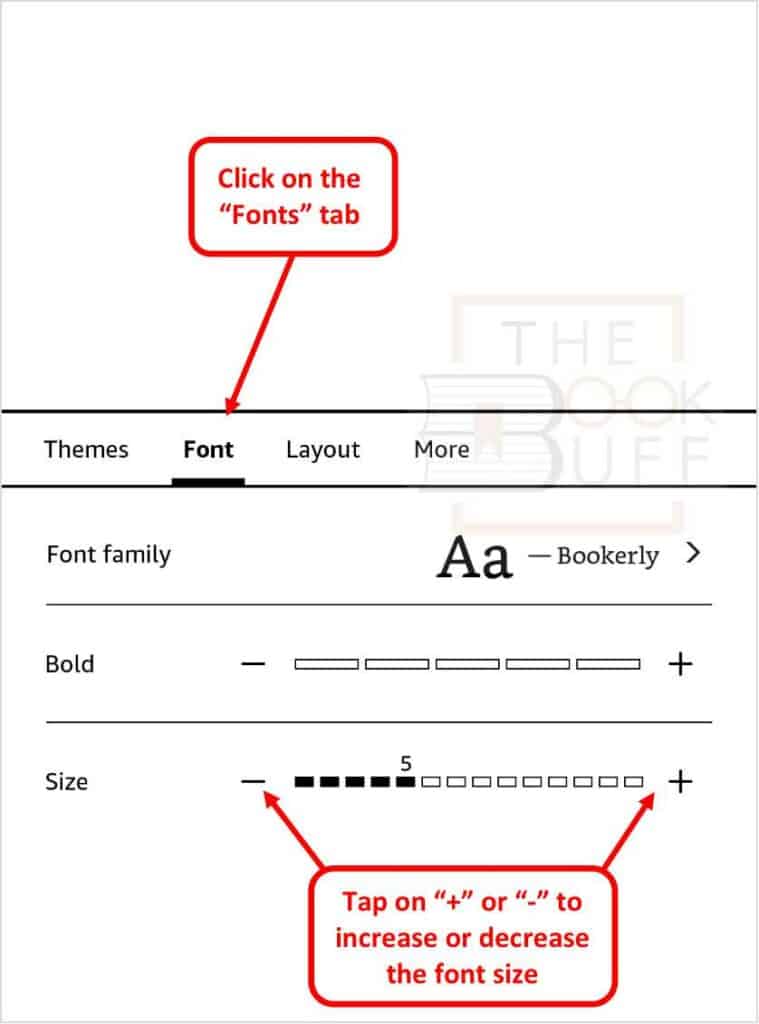
You can also increase or decrease the font size of text on your Kindle. You can do so by accessing the “Font” tab in the “Font” options.
I’ve covered this topic extensively in my other article on how to change the font size on Kindle. In it, I share with you 3 different ways to change the size of the text on your Kindle. Plus, I’ve also provided some tips on how to adjust the font size on the Kindle app. Make sure to check out that article for more details.

About the Author
Akansha is a former business journalist and a seasoned communications professional. She is the founder of TheBookBuff, an avid storyteller, and a lifelong biblophile! Check out her profile page to know more about Akansha.
![How to Transfer Kindle Books? [The Complete Guide!]](https://thebookbuff.com/wp-content/uploads/2021/11/Depositphotos_369820608_XL-optimized-300x200.webp)
![How Long Does Kindle Take to Charge? [Complete Guide!]](https://thebookbuff.com/wp-content/uploads/2022/04/Kindle-Battery-Charging-Indicator-300x225.webp)


![How to Transfer Books to New Kindle? [Complete Guide!]](https://thebookbuff.com/wp-content/uploads/2021/11/pexels-perfecto-capucine-1329571-300x200.webp)