How to Download Kindle Books to Computer? [EASY Guide!]
Disclosure: This post may contain affiliate links. – meaning I may get a commission if you decide to purchase through my links, at no additional cost to you.
Irrespective of whether you own a Kindle device or whether you buy Kindle books to read on your phone, one thing that we all want to do at some point in time (when we have a big enough library of books), is figure out how to get your Kindle books to a computer!
To download Kindle books to your computer, log in to your Amazon account on your computer. Hover over your account name. From the dropdown, click on “content & devices”. Now, click on “More Actions” for the book you wish to download and select the “Download & transfer via USB” option.
But, that’s just a short answer on what to do. In this article, I’ll show you the easiest way to download books on your computer and explain the process in a step-by-step manner with images!
Plus, I’ll also show you two ways to read your Kindle books on your computer (coz, what’s the point of getting books on your computer if you can’t even read them, right?)
So, let’s get started!
Did You Know? You can read Unlimited Kindle books on Amazon with Kindle Unlimited! Check out this special offer to try Kindle Unlimited for FREE. Also, read my other article to learn more about Kindle Unlimited!
How to Download Kindle Books to Your Computer?
There are actually multiple ways in which you can get your Kindle books to your computer.
The most obvious method that people usually go for to get their Kindle books on their computer is to connect the Kindle to the computer via USB and transfer the books.
However, what people often don’t know is that you can simply download the books to your computer from your content library on Amazon!
In this article, we shall be focusing on using our content library to download the books. If you want to know the other method, feel free to click the link above to the article.
Here’s what you need to do to download Kindle books from your Amazon account –
Step 1 – Open the “Content and Devices” Section
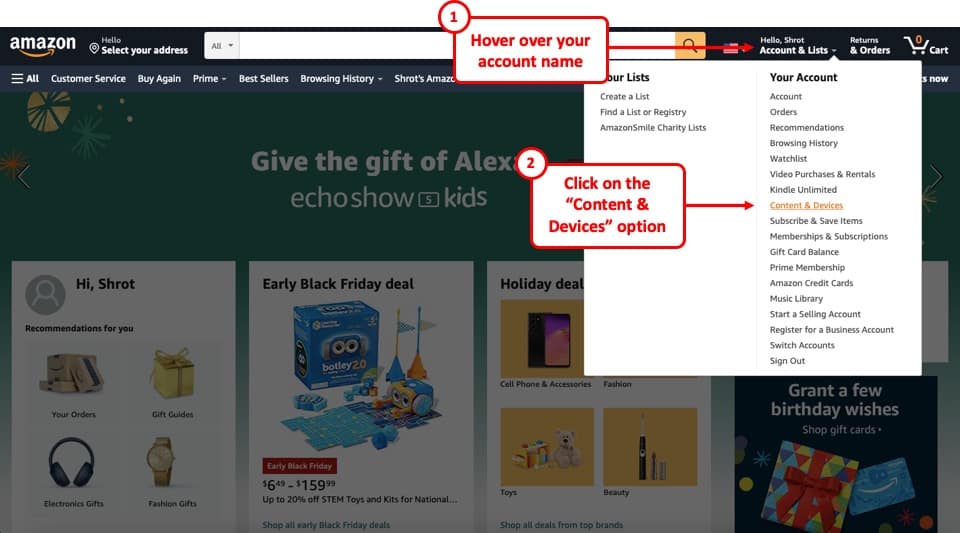
The first step is to make sure that you log in to your Amazon account.
Once you’ve done that, hover over your account name (don’t click on it). A dropdown will appear. From the dropdown, click on the “Content & Devices” option.
Step 2 – Click on the “More Actions” Button
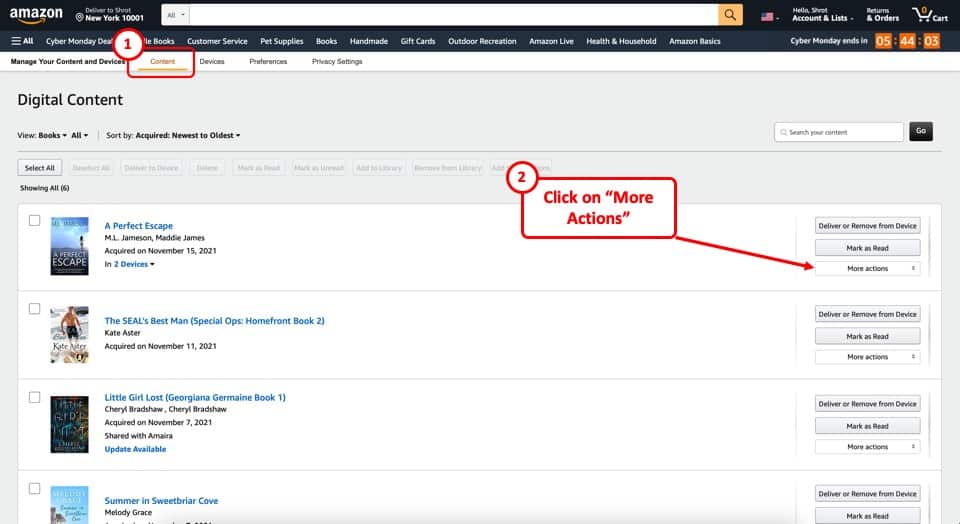
When you click on the content and devices link, you will see the content library page by default. If not, make sure you click on the “Content” tab from the top of the page (as shown in the image above).
Then, choose the book that you wish to download to your PC or Mac, and click on “More Actions“.
For some people, this section may look a bit different, and instead of the button saying “More Actions”, you may simply see a button with 3 horizontal dots (“…”). Click on it.
Step 3 – Click on the “Download & Transfer via USB” Option
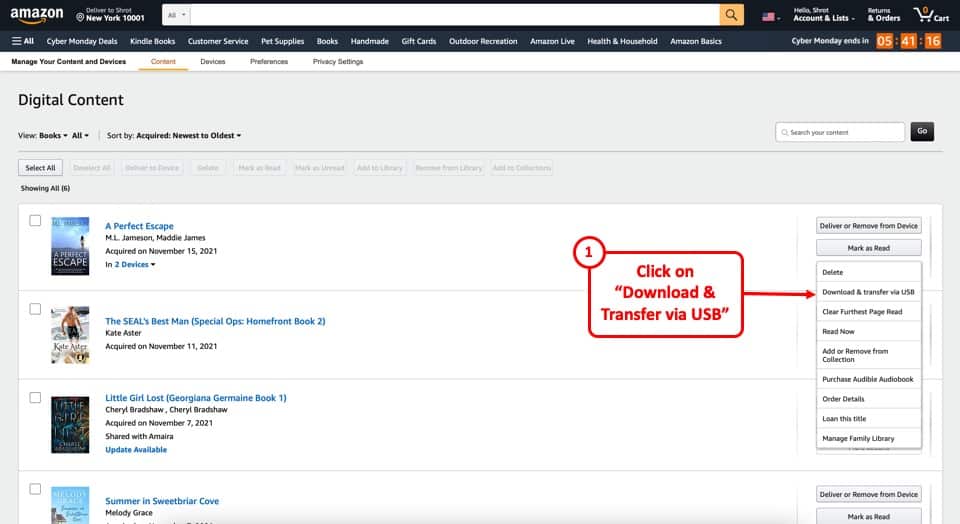
Once you click on the “More Actions” button, a dropdown menu will appear.
From the dropdown, click on the “Download & Transfer via USB” option. This will allow you to download the Kindle book to your computer.
Step 4 – Select Your Kindle Device
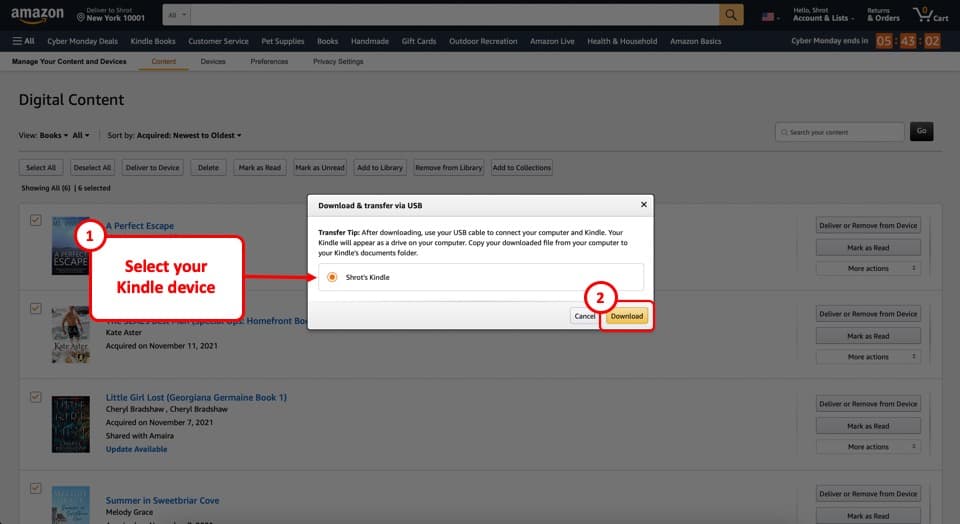
In the next step, select your Kindle device. If you don’t have a Kindle device associated with your account (if you read Kindle books on your phone), you may not see this pop-up window.
Once you have selected your Kindle device, click on “Download“.
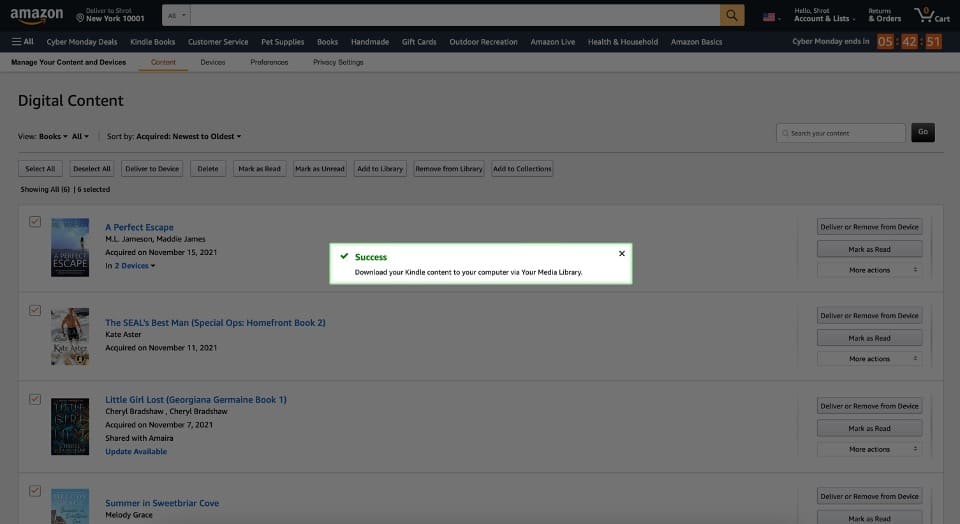
Next, the Kindle book will download on your computer and you will see a success message. Go through all your Kindle books and repeat this step.
While this method is quite easy to follow, the biggest drawback is that you can’t download multiple books at the same time. So, you have to manually download all the books to your computer, which can take an eternity if you have several hundreds of Kindle books!
One thing to keep in mind is that the Kindle books that you just downloaded can only be opened on a Kindle device that is registered to your account. Meaning, you can’t just download and transfer the books to your friend’s Kindle device. Even if you do that, the book just won’t open!
How to Read Kindle Books on Your Computer?
There are primarily two reasons why you would want to download Kindle books on your computer:
- To create a backup and transfer the books to your Kindle using your computer (we’ll talk about this in the next section of this article)
- To read Kindle books on your computer!
Interestingly, you don’t need to download books to your computer in order to read your Kindle books using a computer!
Let me share with you two ways in which you can access your Kindle library using a computer and read books!
Method 1 – Kindle Cloud Reader
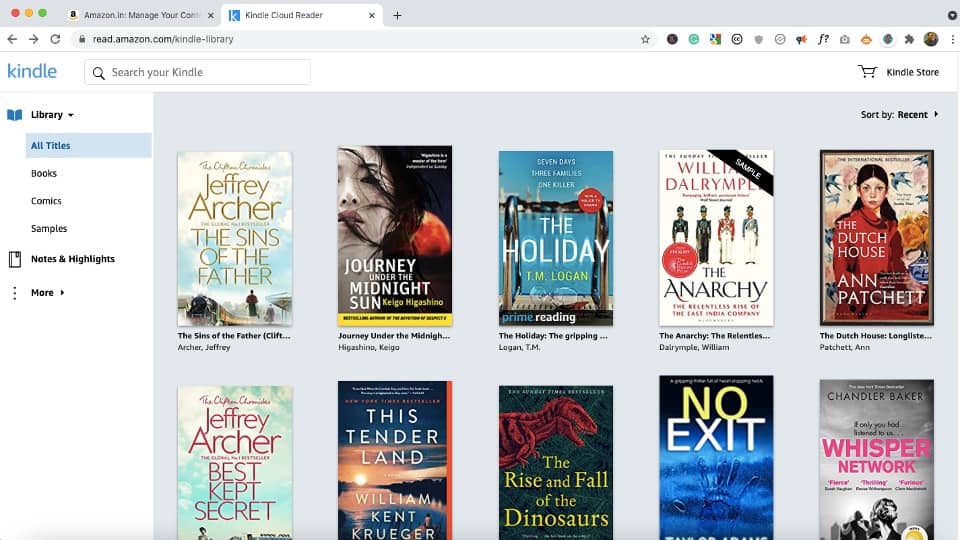
The first method to read Kindle books on your computer is using the Kindle Cloud Reader!
Kindle cloud reader is basically an online version of your Kindle. It allows you to access books in your library, and read the books. The Kindle cloud reader works just like Kindle in that it syncs your latest read position in a book across all your devices.
To access the Kindle cloud reader, open a web browser on your computer. Type in read.amazon.com in the address bar. You may be asked to log in to your Kindle account. You can do so by typing in the login credentials of the Amazon account associated with your Kindle device.
One thing to note is that the Kindle cloud reader requires the internet to function. Since it is a web-based application, your computer needs to be connected to the internet at all times.
So, in case you want to access your Kindle books on a computer that doesn’t have regular access to the internet, you may want to choose the next method!
Method 2 – Kindle for PC Application
Another way to read Kindle books on your computer is using the “Kindle for PC” and the “Kindle for Mac” applications.
The biggest advantage of using the Kindle for PC/Mac application is that it works exactly like a Kindle but for a computer. You can download books just as you would on a Kindle device, and access or read the books even when the computer is not connected to the internet!
The books downloaded using this application can not be extracted outside of the application anymore (it was possible previously, but Amazon has since restricted this process).
Here’s how to read books using the “Kindle for PC/Mac” application –
Step 1 – Add the Kindle for PC/Mac Application to Your Cart
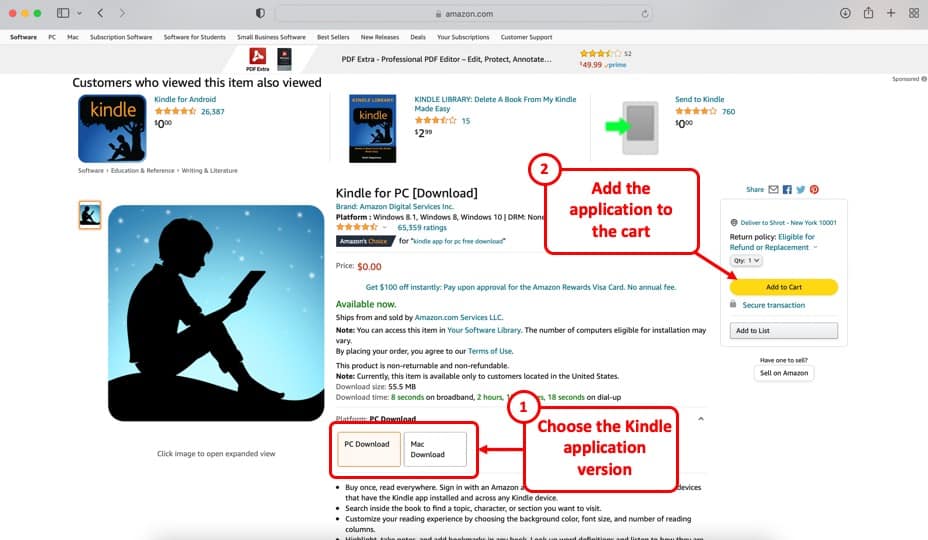
The first step is to download the Kindle application on your computer. To do that, open the application page on Amazon. Choose the PC or Mac version for download.
Then, add the application to the cart. Proceed through the next steps as you would purchase any other product on Amazon. Don’t worry, you don’t need to pay anything.
Step 2 – Check Your Email for Product Download Link
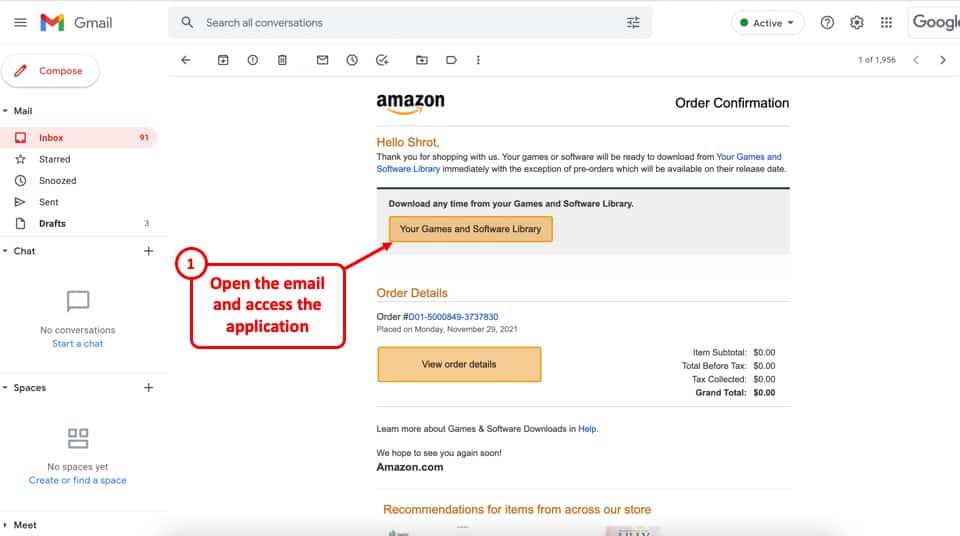
Once you’ve completed the steps to purchase the application from the cart (for $0), you will receive an email for the confirmation of your order.
Simply click on the “Your Games and Software Library” to view and download the application. Alternatively, you can also visit the same section from the “My Account” section, by clicking on the “Digital Games and Software” link.
Step 3 – Download and Install the Application
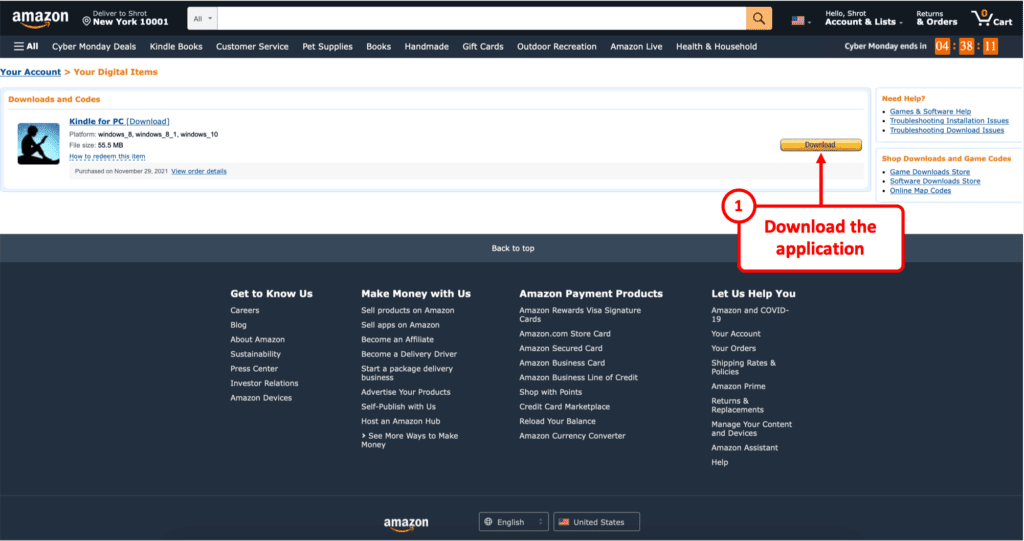
Upon clicking on the link, you will be redirected to the library for digital items. Here, you will see the Kindle for PC/Mac application that you just ordered.
Simply click on the “Download” button to download the application. The application size is quite small and it should download within a few seconds depending on your internet speed.
Once the application is downloaded, install the software as you normally would install any other software. Run through the installation wizard. Once the installation is complete, move to the next step.
Step 4 – Log in to Your Kindle Account and Start Reading
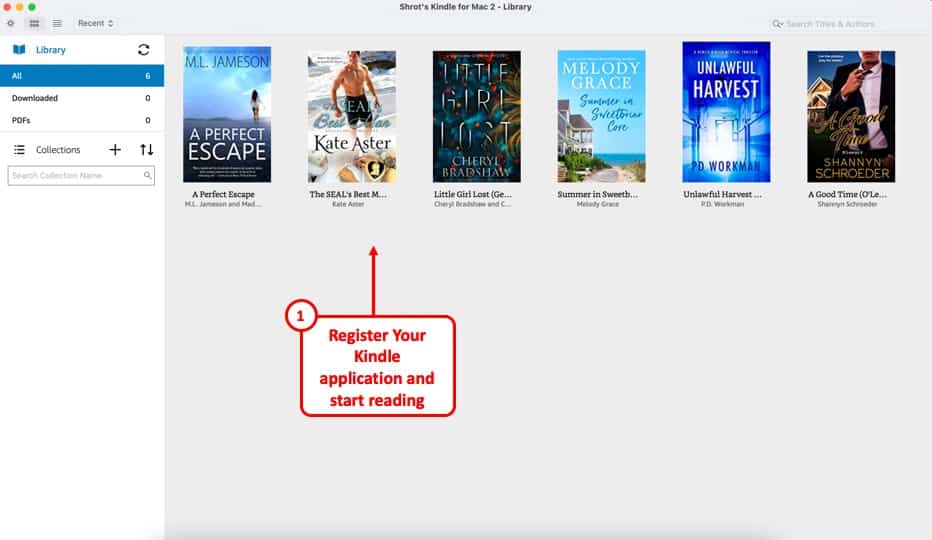
Once the installation is complete, open the application. You will first be prompted to register your Kindle account by logging in to the Amazon account associated with your Kindle books.
Log in using your Amazon account username and password.
Once you have logged in, wait for the application to sync. After that, you will see all the books from your Kindle library appear. Simply click on any one book to download it to your computer and start reading!
How to Transfer Books to Kindle from Your Computer?
As I mentioned earlier, one of the purposes of downloading the Kindle books to your computer is to transfer books to your new Kindle.
You can easily transfer the books to your Kindle from your computer. In fact, I’ve written a detailed article on this topic. Make sure you check out my other article on how to transfer books from computer to Kindle (and back!) for full details. I have provided the step-by-step process along with images in my other article.
Related Article – How to Transfer Kindle Books? [A Complete Guide for Every Situation!]
However, here’s what you need to do briefly –
- Connect your Kindle to your computer using a compatible USB cable.
- Open the “Kindle Drive” on your computer
- Then, open the “Documents” folder in your Kindle drive. If you are connecting a Kindle Fire, open the “Internal Storage” first and then the “Books” folder.
- Copy the books from the folder on your computer to the “documents” folder on your Kindle (or the books folder on Kindle Fire).
- Once the transfer is complete, right-click on the “Kindle Drive” and click on “Eject” to eject the Kindle drive safely
After that, simply open the “Library” on your Kindle device, and you should be able to access all the books that you just transferred.
One thing to remember (as I mentioned earlier in the article), you will only be able to access the books that you just transferred as long as you log in to the account that you used for purchasing the books.
Credit to Alexandru Molnar from Pexels for the featured image of this article.

About the Author
Akansha is a former business journalist and a seasoned communications professional. She is the founder of TheBookBuff, an avid storyteller, and a lifelong biblophile! Check out her profile page to know more about Akansha.

![Does Reading Improve Memory? [Here’s What We Found!]](https://thebookbuff.com/wp-content/uploads/2021/10/puzzled-woman-thinking-and-holding-clipboard-while-22C2V42-optimized-300x200.webp)
![Kindle vs. Books: Which is Better for Reading? [Full Guide!]](https://thebookbuff.com/wp-content/uploads/2021/11/pexels-perfecto-capucine-1329571-300x200.webp)
![Kindle Paperwhite vs Oasis: Which is Better? [Full Guide!]](https://thebookbuff.com/wp-content/uploads/2023/08/Kindle-Paperwhite-vs-Oasis-300x201.jpg)
![Should You Read in a Moving Car? [Can It Hurt Your Eyes!]](https://thebookbuff.com/wp-content/uploads/2022/03/pexels-rodnae-productions-8052242-300x200.jpg)
![Transfer Books From One Kindle to Another? [Step-by-Step]](https://thebookbuff.com/wp-content/uploads/2021/11/reading-books-gadget-kindle-ebook-reading-with-kindle-kindle-book_t20_8dKzk6-300x200.webp)